I thought I would provide some tutorials on how to create some interesting vocals other than your typical delay and reverb.
Using Image Line’s Harmor to Create Vocal Chords
Harmor’s resynthesis engine allows you to do some pretty spectacular things with audio files, and one of the best is the ability to create chords out of vocals. There are so many other modifications you can do with the audio files in Harmor as well, such as manipulating the time envelope to create stutters, holds, and reverses, even wobbly sounds.
The first thing to do is to record or use a vocal track and find a C note if you want the keys to be properly mapped (you don’t have to do this, but for purpose of manipulating the sound and making a synth-like preset, it really is the way to go in my opinion). 

You can use some type of pitch correction/detection software like Newtone, Pitcher, Autotune or Melodyne to find or move a vocal to C (even if you only have the demo version of Newtone you should be able to export the vocal to a wav file from the playlist). Keep the modification of the natural pitch variance in the vocal to a minimum for a more natural sound. Not all vocals will migrate smoothly to a different pitch, so there is a bit of trial and error required to find a good sound to use.
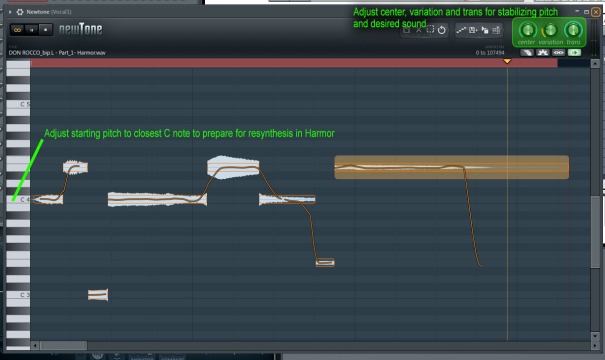
Once you have the recorded vocal, take a look at the recoding and trim the extra silent space and unwanted recordings at the beginning and end of the file. We’ll do this to have the vocal sound start at note activation of a note in Harmor. Save your file somewhere where you can drag it into Harmor.
In Harmor choose the resynthesis preset. Then, in the Harmor GUI, click on the “IMG” tab, and drag your file into the window. You should see a visual representation of the audio file. You should now be able to activate the recording through Harmor by clicking on a key in the GUI with the mouse, or your MIDI controller. If you hold it you will see that it naturally loops if you hold it longer than the duration of the recording. 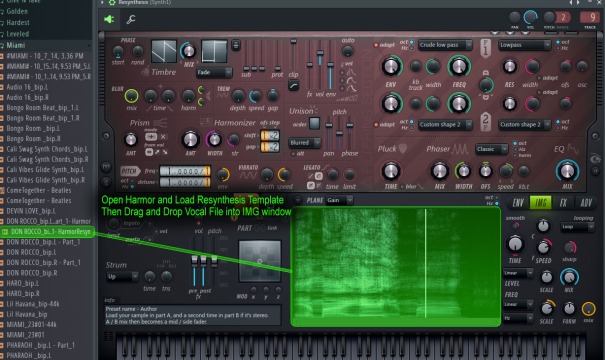
If we want it to hold a sound until release we will need to create a looping envelope that sounds natural. So what we will do is use the “Image Time Offset” envelope. If you want your envelope tempo synched click on the radio button next to “Tempo” on the lower left of the envelope interface. Next, you may want to move the end point of your envelope if you used the time synched option so that it is a certain length. Now create a node somewhere between the start and end of the envelope, and right click to get the menu option to define “Loop start”, then define the point of the “Sustain/loop end” from the endpoint which has likely moved to the same vertical position as the loop start. At this point the looped portion is more of a held harmonic position, but you can add a little variance by creating another node between the start and end of the loop, and raising or lowering the vertical position. This is a balance so you just want to play around with it until it sounds acceptable.
Play a couple of chords to see how it sounds. Save the preset when you are happy with it.
Using Harmor to Create Vocal Legato
If you have something you are happy with in the previous example with the vocal chord preset. We can make a variation that won’t play chords but will allow your vocal to move from note to note while it is playing by just simply activating the “Legato” on the left side of the Harmor GUI. This creates a more artificial sounding vocal, but can make some interesting sounds. If you are happy with the results of this preset save it as a different preset.
Using Multiple Vocal Recording Takes
One method that a lot of recording studios and vocalists use is to layer multiple vocal recording takes on top of each other to create a natural unison sound, or even a natural chord-like sound. You can take this technique a little further for some great effects. One method is to pan one take hard left, another take hard right, and then keep one centered – you can then apply different effects to each with less overlap. Alternatively you can apply a strong effect to the center channel (e.g., heavy distortion) while applying subtle to no effects on the panned takes. The center channel bridges the vocals together, while the panned channels preserve some clarity.
Getting Dirty
One of my favorite things to do with vocals is run them through an Guitar Amplifier type effect plug-in to create that dirty distorted and crunchy sound or to add some Wah Wah to a held note. Amplitube is a great plug-in to use to do that, but there are many others available.